Polygons can be added from library stock to create textured ground surfaces or place ground markings . They are added using the "Polygons" tool to position the texture. The shape of the polygon can be edited and curved as other similar structures.
Polygon surface textures are not recognised by AI aircraft, so they can be used to add roads, paths, car parks and grass areas, etc..
In December 2017, Zeynep put a question on the X-Plane.org community website. The question was essentially, "how do you create a red airport runway surface?" - you should never ask why!
This seemed a good opportunity to explain how to create a simple ground polygon to do the job.
- Create a
texture.png file with the colour and texture you want to use.
In this case, I created a file called RED.png which was a
1024 x 1024 square of red with a few streaks of darker and lighter red.
- Create a
plain text file with the format instructions for the polygon.
I called this file RED.pol
to enable it to be read by the
compiler. The text was as follows;
A
850
DRAPED_POLYGON
TEXTURE RED.png
SCALE 500 500
NO_ALPHA
SURFACE asphalt
LAYER_GROUP airport -1
- Place both
files in the Named Airport folder within Custon Scenery
- Using the
WED, the polygon can be placed from the local scenery folder and the
texture orientation can be set. Set the overlaying XP runway texture to
transparent in order to see the red polygon.
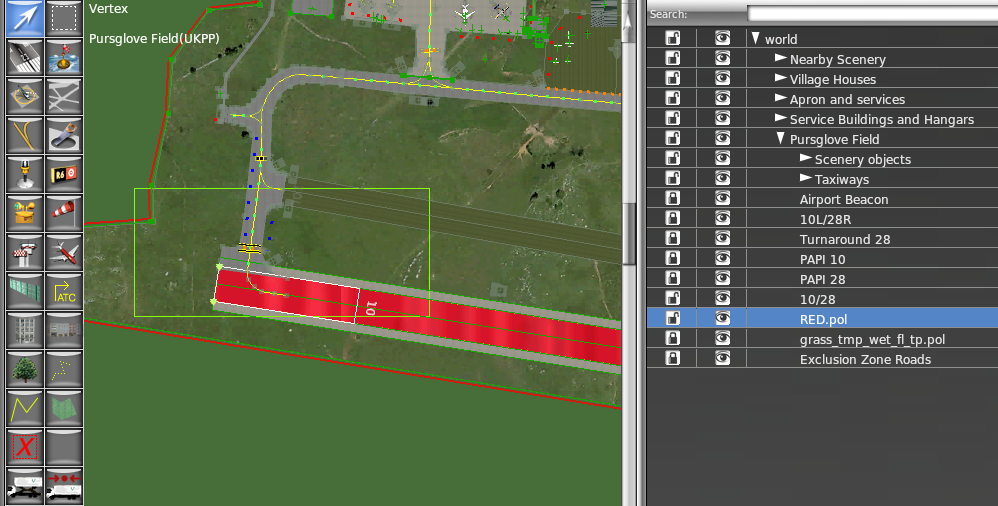
- Check the results in X-Plane.

Of course, the runway now needs to be marked out with centreline dashes and end numbers as well as precision marks, etc.. but the taxiway markings and runway lights are still visible.
The settings
A
850
DRAPED_POLYGON
This set of markup identifies the text file as a polygon. If this coding is not present, the file will be ignored.
TEXTURE RED.png
SCALE 500 500
The texture file to use is identified here (RED.png) and the scaling of the texture file is shown (500 x 500 meters). Equally, If you were using a photographic texture file, the scaling could be set at the size or parameters of the image. (say in this case - 45m x 1800m for a runway).
NO_ALPHA
SURFACE asphalt
The next two lines are set to give the surface some qualities. In this case No Reflections and the qualities of an asphalt surface. If you make the SURFACE dirt, then you will probably land and take off in a dust cloud.
The last line is a layer instruction which places the texture polygon above the ground mash, but below all other textures.(-1). If you set it to (1) then the polygon will sit above all of the other layers.

To refine this polygon, the LAYER_GROUP airport -1 could be changed to LAYER_GROUP markings -1. That would move the polygon up from the base mesh to the runway surface, but place it as the runway surface. The .pol file should be above the runway in the list. By using this method, the runway texture can remain as asphalt and the red polygon can be used on a section of the runway.

Polygons can be any shape and any texture as long as their different node sections do not overlap. They are often used to texture tarmac and grass where the default or library files do not provide the effect required.
Top Tips
If your texture.png file does not conform to the X-Plane standards, there will be a black band between any repeats in the texture pattern. This will look odd on the scenery output.
Should you wish to add another polygon over the one you have just created, you will need to place it above the previous polygon in the XML markup, or place the polygons in different layers. i.e. -1; 1; 2:
Two polygons that meet should be abutted. The nodes can be merged to make them fit exactly. If polygons in the same layer overlap, they will flicker.